What you will learn
You will learn:
- to configure your Podfile with our Gitlab and our SDK
- to configure the SDK in your application
- generate a beacon notification
Prerequisites - What you need to get started
- A Gitlab Account: The SDK is available through a private Gitlab. You must have received an email from our private Gitlab that permits you to create an account associated to your email.
- Your SDK user information: To initialize the SDK, you should have received a Login, a Password and a Company name.
- A beacon: A beacon configured on your account is mandatory to test the application.
- An iOS Device: You need a compatible Bluetooth Low Energy iOS device that is able to detect beacons.
- The Xcode application: Xcode should be downloaded from the App store
Step 1: Configure your access to our Gitlab
- Generate your SSH KEY. You can check the how to Generate SSH tutorial
- Connect to the Connecthing Gitlab server
- You can reset your password if you forget it, at the following address
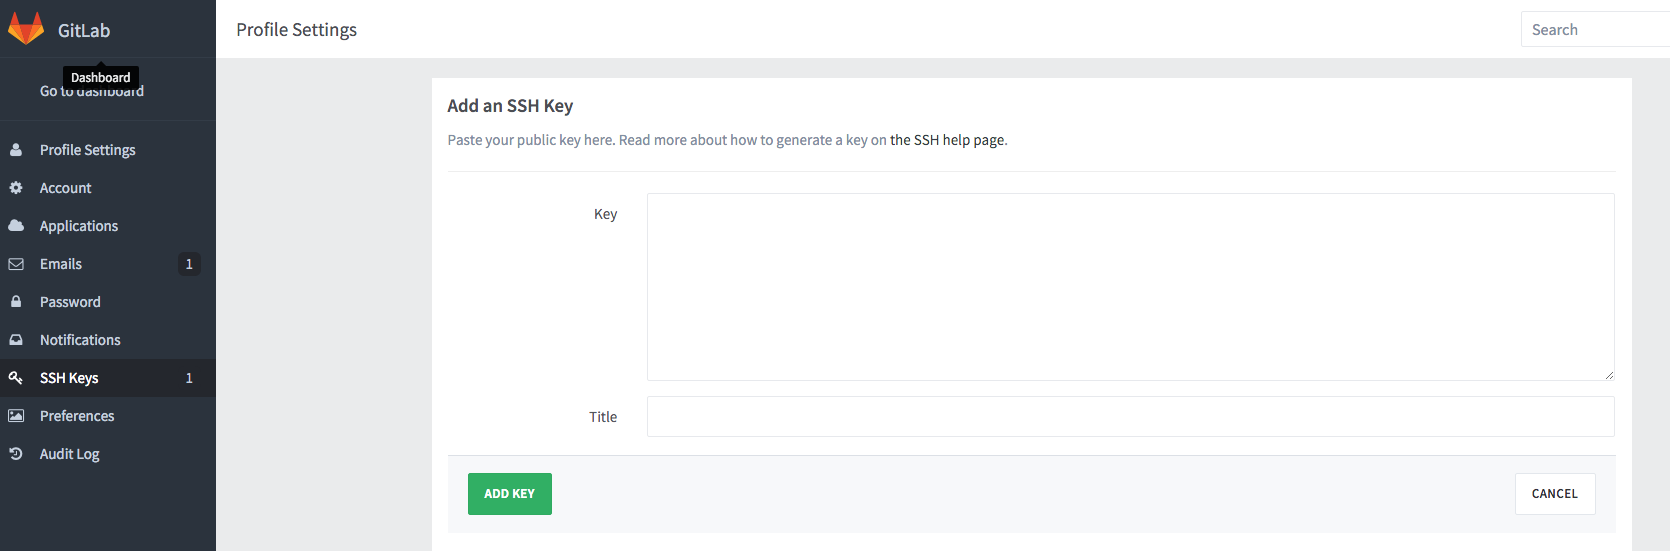
- Click on profile settings at the left of the page and it will populate to box automatically.
- Click on SSH keys, then, at the top of the page, add your SSH KEY as describe in the picture bellow
Note:
If you forget the your Gitlab password, you can reset it here
Step 2: Clone the beacon-tutorial repository
- Clone the beacon-tutorial repository
git clone https://github.com/Connecthings/sdk-tutorial.git
objectivec
- Open the iOs>ObjectiveC>Beacon>1-QuickStart>QuickStart-starter folder from the cloned sdk-tutorial folder
SWIFT
- Open the iOs>SWIFT>Beacon>1-QuickStart>QuickStart-starter folder from the cloned sdk-tutorial folder
Step 3: Configure a Podfile with our Gitlab link
- Install CocoaPods
$ gem install cocoapods - At the root of the sample repository, check if a Podfile already exists
- If the file doesn't exist in your project repository, create it. This can be done by running
$ touch Podfile - Add the following parameters to your Podfile
platform :ios, '8.0'
target 'QuickComplete' do
  # Uncomment this line if you're using Swift or would like to use dynamic frameworks
  use_frameworks!
  pod "ATConnectionHttp",:git => "https://forge.adtag.eu/ConnecthingsSDK/ATConnectionHttp.git", :tag => "2.5.8"
  pod "ATAnalytics",:git => "https://forge.adtag.eu/ConnecthingsSDK/ATAnalytics.git", :tag => "2.5.8"
  pod "ATLocationBeacon",:git => "https://forge.adtag.eu/ConnecthingsSDK/ATLocationBeacon.git", :tag => "2.5.8"
  # Pods for QuickComplete
  target 'QuickCompleteTests' do
    inherit! :search_paths
    # Pods for testing
  end
  target 'QuickCompleteUITests' do
    inherit! :search_paths
    # Pods for testing
  end
end
- Run
$ pod installin your project directory
Note:
Your project is Linked to Corelocation, and libsqlite3 Frameworks
Step 4: Open our sample into Xcode
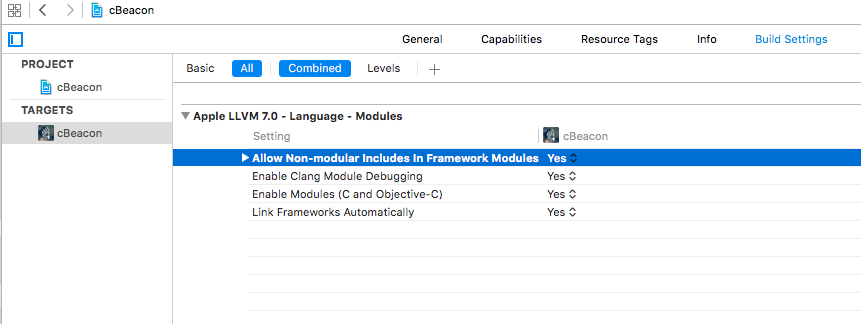
- Open App.xcworkspace: you will use this new file generated to manage your project.
- Click on your target project, then "build settings". Make sure that Allow Non-modular includes in Frameworks Modules is set to yes as describe in the picture bellow
Step 5: Configure the info.plist
The SDK accesses to two critical frameworks: * the CoreLocation framework to detect iBeacon. * the CoreBluetooth framework to check the bluetooth status.
Both of them requires an explict permission from the user.
The iOs system, to ask the permissions, needs the application to provide an description about the usage of the framework.
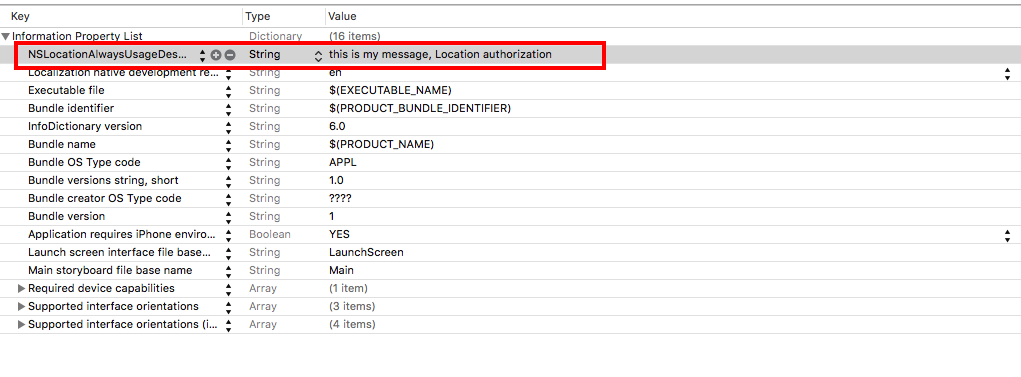
These descriptions can be configured opening the info.plist file and adding the following keys: * "Privacy - Location Always Usage Description"" for the location permission
<key>Privacy - Location Always Usage Description</key>
<string>Your description goes here</string>
* **"Privacy - Bluetooth Peripheral Usage Description""** for the bluetooth permission
<key>Privacy - Location Always Usage Description</key>
<string>Your description goes here</string>
Warning:
If you don't configure these both usage descriptions:
- the application will crash when trying to use the CoreLocation or CoreBluetooth framework.
- the App Review Team will reject your application.
Step 6: Configure the SDK inside the ApplicationQuickStart class
-
Open the AppDelegate.h file
-
To simplify the integration, extend your AppDelegate with the ATBeaconAppDelegate
@interface AppDelegate : ATBeaconAppDelegate <UIApplicationDelegate>
-
Open the AppDelegate.m file
-
Implement the applicationDidBecomeActive method and call the super method:
- (void) applicationDidBecomeActive:(UIApplication *)application{
    [super applicationDidBecomeActive:application];
}
Warning:
The ATBeaconApDelegate class implements several methods of the UIApplicationDelegate.
Always call the super method when implementing a method from the UIApplicationDelegate.
- Configure the initAdtagInstanceWithUrlType with the received informations from Connecthings in the didFinishLaunchingWithOptions method:
- (BOOL)application:(UIApplication *)application didFinishLaunchingWithOptions:(NSDictionary *)launchOptions {
    NSArray *uuids = @[@"**** UUID ****"];
    [self initAdtagInstanceWithUrlType:ATUrlTypeItg userLogin:@"USER" userPassword:@"PSW" userCompany:@"COMPANY" beaconArrayUuids:uuids];
    return YES;
}
Note:
The AdtagInitializer permits to configure the access to the various Adtag platforms. Connecthings gives you access to three platforms :
- The Demo platform is ideal for the technical Proof of Concept (POC) phase
- The Pre-production platform is ideal for the beta versions
- The Production platform is used when you're ready to publish your application
Warning 1:
Be sure to use the good access key login / password with the appropriate platform - for each platform (Demo/Pre-production/Production) you have received a specific access key.
Warning 2:
Connecthings send you a user to connect to the Adtag Platform and a user with an API KEY to be use with the SDK. Be sure to use the user with the API KEY to connect the SDK to the Adtag Platform, otherwise the application won't detect the beacons.
Warning 3:
Connecthings sent you two different access keys for each platform: - An access key to sign in to the Adtag Platform - An access key to use with the SDK mobile, called API_KEY. Be sure to use the correct API KEY (login, password, and platform) to connect the SDK to the Adtag Platform, otherwise the application won't detect the beacons.
Step 7: Test the configuration
-
Connect your iOS Device to your computer (the device must be registered on Apple’s developers portal)
-
Activate your beacon
-
In Xcode, click on "Play" to launch the installation process on your phone
-
Once the application is running:
- if you see "BACKEND_SUCCESS, 1 beacon(s) detected, 1 content(s) attached to the beacon in the Adtag Platform", this means your SDK and your beacon are correctly configured. You can go to the next step.
- If you see "BACKEND_SUCCESS, 0 beacon(s) detected, O content(s) attached to the beacon in the Adtag Platform", check that you correctly activate your beacon and you configure the SDK with the correct UUID
- If you see "BACKEND_SUCCESS, 1 beacon(s) detected, O content(s) attached to the beacon in the Adtag Platform", that means your beacon is not registered into the Adtag Platform or no content has been attached. You can learn how to attach content to beacon reading the Updating the content on the Adtag platform tutorial
- If you see "BACKEND_ERROR, 1 beacon(s) detected, O content(s) attached to the beacon in the Adtag Platform", check the credential and company you use to intialize the SDK.
-
Before going to the next step, stop the beacon emission, and wait untill you see "0 beacon(s) detected".
Tip:
There are 2 solutions to stop the emission process:
- You can put the beacon inside a microwave (but don't start it!)
- You can remove the battery from the beacon (in that case, depending on the model, it can take up to 30 seconds for the beacon to start emitting again when you put the battery back)
Step 8: Configure an app to receive beacon notifications
Register on the notification center
-
Open the AppDelegate.m file
-
Register the application on the notification center in the didFinishLaunchingWithOptions method
-(BOOL)application:(UIApplication *)application didFinishLaunchingWithOptions:(NSDictionary *)launchOptions{
[...]
  if ([application respondsToSelector:@selector(registerUserNotificationSettings:)]) {
      [application registerUserNotificationSettings:[UIUserNotificationSettings settingsForTypes:UIUserNotificationTypeAlert|UIUserNotificationTypeBadge|UIUserNotificationTypeSound categories:nil]];
  }
  return YES;
}
Note:
Starting from iOS 8, you must register the application on the notification center, even if you are only using local notifications
Retreive the Notification content
-
Open the AppDelegate.h file
-
Add the ATBeaconReceiveNotificatonContentDelegate. This delegate permits to be notified when a beacon local notification is clicked
@interface AppDelegate : ATBeaconAppDelegate <UIApplicationDelegate, ATBeaconReceiveNotificatonContentDelegate>
- Register the new delegate after the SDK initialization with the method registerNotificationContentDelegate from the ATBeaconManager
- (BOOL)application:(UIApplication *)application didFinishLaunchingWithOptions:(NSDictionary *)launchOptions {
    [...]
    [[ATBeaconManager sharedInstance] registerNotificationContentDelegate:self];
    [...]
    return YES;
}
- Implement the didReceiveNotificationContentReceived method of the ATBeaconReceiveNotificationContentDelegate
-(void)didReceiveNotificationContentReceived:(ATBeaconContent *)_beaconContent {
    // retreive the notification content
}
Step 9: Generate your first beacon notification
If your beacon is already emitting, you must stop/restart the emission process in order to simulate a new region entry for the smartphone, and generate a notification and wait one minute before doing the test.
-
In Xcode, click on "Play" to launch the installation process of the application you just built on your phone
-
Put the application in the background.
-
Activate your beacon: Remove the beacon from the microwave or put the battery back.
-
Wait for a few seconds (maximum 1 minute)
-
The notification appears on your screen